Browsing Category

recipes & crafts

recipes & crafts

Crockpot Chicken & Dumplings

Crockpot Chicken & Dumplings

Another wonderful smelling meal for a lazy Sunday when you want to relax for the day. Just toss together these few ingredients and enjoy a tasty soup. You can make this a creamy style soup or just add more water or chicken broth for a thinner broth. It’s up to you! I do usually end up adding a little bit more broth/water after adding the biscuits.

Crockpot Chicken & Dumplings

Crockpot Chicken & Dumplings

Crockpot Chicken & Dumplings

Crockpot Chicken and Dumplings

Ingredients
3 Tablespoons butter
1 large can cream of chicken soup
3 – 4 cups chicken broth or water with chicken bouillon
onion, diced
carrots, chopped
celery, chopped
2 Tablespoons parsley
Salt and pepper to taste
5 boneless, skinless chicken breasts, cut into small pieces
2 cans of refrigerated buttermilk biscuits

Directions
Add all of the ingredients except the biscuits into your crock pot. Cook on high for 5 hours. Cut the biscuits (uncooked) into small pieces and add to the crock pot. Cook on high for 1 more hour. If you need to add more broth or water to make it thinner you can do so.

Tips
You can use any amount of onions, carrots, and celery that you would like. You can also put the chicken breasts into the crockpot whole and after the 5 hours of cooking you can shred with a fork. I prefer to cut the chicken prior to adding it to the crockpot as it is quicker and less messy!

Crockpot Chicken & Dumplings

PRINTABLE RECIPE FOR YOU

recipes & crafts

Ham & Bean Soup

Ham and Bean Soup

I finally decided to upgrade our crockpot from a 4 quart to an 8 quart and you can bet that I wanted to use it right away. Ken had bought a small ham the other day and I was going to make scalloped potatoes and ham, but decided to try making ham and bean soup instead. There are so many versions and recipes out there that I just picked up a few cans of navy beans and added in whatever else I had in the house. I have to admit I wasn’t sure if I would like it, but it was so delicious.

Making ham and bean soup

Next time I make it I think I will try adding some small chunks of potato too. I love potatoes cooked in the crockpot.

Can’t you just smell that deliciousness? Best part of cooking in the crock pot in my opinion is how wonderful my house smells all day.

Ham and Bean Soup

Ham & Bean Soup – Slow Cooker Recipe

Ingredients:
6 large carrots or ½ pound bagged carrots, chopped
6 ribs celery, chopped
2 cloves garlic, chopped
small onion, chopped
3 – 16 oz. cans navy beans, rinsed and drained
2 – 32 oz. chicken broth (or less if you don’t want it real soupy)
4 cups ham, chopped
1 tablespoon parsley
1 teaspoon thyme
1 teaspoon paprika
1 teaspoon salt
1 teaspoon pepper

Directions:
Add all of the ingredients to your slow cooker and cook on high for 4 -5 hours or low for 8 hours.

PRINTABLE RECIPE FOR YOU

recipes & crafts

Cinnamon Cheesecake

This Cinnamon Cheesecake is so delicious and people will think you slaved over this yummy desert, but it is super easy to make. I’ve made this several times and the other day when I bought the ingredients to make it on a whim I thought I would share it with you all. If you love cheesecake and cinnamon I promise you will be amazed at how great this tastes with very little effort.

Cinnamon Cheesecake

Cinnamon Cheesecake

 Ingredients:
2 pkgs. crescent dinner rolls
2 8oz. bars of cream cheese, softened
1 cup sugar
1 tsp. vanilla
Topping-
1 stick butter (melted)
1/2 cup sugar
3 tsp. cinnamon

Directions:
1. In a 13 x 9 ungreased pan, spread 1 package of crescent rolls on the bottom of the pan. 
2. Mix in a bowl the softened cream cheese, 1 cup sugar, and vanilla. 
3. Once creamy, pour evenly over rolls. 
4. Spread the second package of rolls on the top. 
5. Melt butter and pour over rolls.
6. Mix 1/2 cup sugar and 3 tsp. cinnamon in a baggie.
7. Sprinkle mixture over top of butter.
8. Bake at 350 degrees for 30 minutes.

Tip: It tastes the best when served warm!

PRINTABLE RECIPE JUST FOR YOU

Cinnamon Cheesecake

recipes & crafts

Button Heart Valentine Craft

Valentine's Day Craft

Our oldest son Andrew made this Button Heart Canvas for his girlfriend for Sweetest Day last year. I thought we would share the details for a homemade craft for Valentine’s Day. We found the idea on Pinterest which led to this tutorial. We used a larger canvas and needed two bags of buttons. Andrew also painted Andrew + Ali on his instead. I loved the way it turned out and I think his girlfriend was shocked that Andrew made something for her.

Valentine's Day Craft - Supplies
Supplies:
Plain white canvas
2 Bags of Red Assorted Buttons
Black Paint
Red Paint
Paintbrush
Painters Tape
Red burlap or Red Cross Stitch Fabric (what we used)
Hot Glue Gun

Valentine's Day Craft - Step 1
Step One
Tape off stripes on the canvas. Be sure to space equally, use a tape measure if needed.

Valentine's Day Craft - Step 2
Step Two
Use the black paint and paint all of the stripes including the sides. Peel off the painters tape after about 30 minutes depending on what type of paint you used. The trick is to remove the tape before it is completely dry. Let the paint dry completely.

Valentine's Day Craft - Step 3
Step Three
Cut out a large heart with the burlap or cross stitch fabric. He made a heart template using a large piece of paper, folding it in half, and then cutting out the heart. Then trace the heart onto the burlap/fabric and cut it out. Flip it over if you can see any of your lines from tracing. Using a hot glue gun, glue all of the buttons onto the heart randomly. Once the glue dries you may have to cut away any stringy things left behind from the glue.

Valentine's Day Craft - 4
Step Four
Using the red paint write a message such as “I love you” or both of your names. Maybe include the date or year as well.

Valentine's Day Craft - Step 5
Step Five
Glue the red heart onto the canvas. Use a ruler to find the exact center of your canvas if needed.

And then surprise your significant other with your masterpiece. Anything handmade is bound to win them over!

Valentine's Day Craft

Valentine's Day Craft

recipes & crafts

Good old crafting days

If you watched my last video on YouTube– this goes right along with my problem of not being able to stick with things that I start.

As I was cleaning and organizing my bedroom the other day I ran into all sorts of goodies. I keep trying to remember how in the world I ever had time for these sort of time consuming hobbies. Then I remembered these were the days before I had to run 4 kids to activities, help them with their homework, and let’s be honest – reality television has too many darn good shows on TV these days.

yarn stash

I discovered my yarn stash and a few projects I started and never finished. Ever since Chase and Karli seen them they haven’t stopped bugging me to finish them. Karli wants the scarf finished and the pink and purple blanket was supposed to be a small one for her dolls. The other piece was supposed to be a blanket for Chase that I honestly don’t think I would ever finish, but I do like the colors so maybe I will make I will make him a different blanket instead.

projects

Then I found a big Rubbermaid container of sewing supplies and a bunch of toddler sized clothing. I almost started laughing because I can barely remember back when I first bought my sewing machine and I had all these aspirations to make all these pieces for Karli. It was back when people would take plain jeans and shirts and decorate them with pieces of fabric and create the cutest outfits. I remember saving photo after photo on my computer for design ideas.

crafting stuff

This was an outfit that I made for Karli for her first birthday. It was a plain jean dress and I added all the fabric.
dress

I sewed this dress for Karli for Easter. It ended up being the only thing I sewed from scratch after buying all those patterns. I can remember being so proud of myself for being able to sew pleats! I knitted this sweater for Karli as well.
sweater&dress

This turquoise dress was horrible, it hung all wrong. Fail! This red and white striped dress was one of my favorites. She wore it for her 2nd birthday.
dresses

I’m not sure what even happened to this hat and scarf, but the poncho is in Karli’s bin of dress up clothes and she has worn it as a skirt many times.
poncho & hat n scarf

And lastly, the corny looking hat I made for myself, which is also somewhere in Karli’s dress up clothes.
knitted hat

I guess all I am saying is why did I stop knitting and how can I find time to do it again? There are not enough hours in the day to do all the fun stuff I enjoy. Not only that, but I totally forgot how to knit and crochet so I will have to learn all over again. Bummer.

recipes & crafts

Cookie decorating… I did it!

Sharing my first attempt at making my own cookie dough and frosting from scratch…and sharing the recipes with you!

Back in October I had written a short list of things that I had on my TO DO list. How ironic is it that while so many are writing about their goals for 2013, I am going to write about the things that I have accomplished. YES! See that is the thing- you should always continue to make goals, you should always be thinking of ways to better yourself. The part that so many people forget to take the time for is acknowledging the goals that you have accomplished. Am I right?

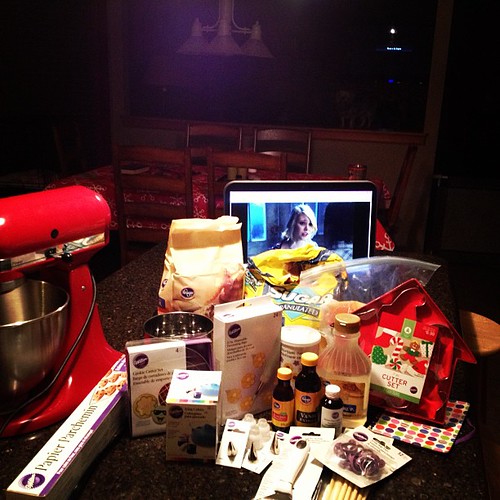
So I’m going to toot my own horn hear and say that I actually made some pretty darn good cookies this year. As I mentioned in the other post, I had purchased a bunch of supplies to make these cookies before Halloween and for whatever reason I never got around to making them. The guilt set in and the weekend before Christmas I decided it was time to see if I could make these fancy pants cookies that I have seen so many others make. I wanted the perfect looking frosted ones, not the ones where you just use a butter knife to smear frosting all over the cookie.

I set up my laptop to watch listen to Gossip Girl and gathered all the supplies. I was most excited about being able to use my KitchenAid mixer. Don’t tell me that you don’t think playing with kitchen appliances is fun, you know it is!

Attempting to make sugar cookies and frosting from scratch.

The dough I made smelled so good. I’ve made dough from scratch before, but I can’t recall whether or not the recipe called for almond extract. I don’t think I will ever try another sugar cookie recipe again, this one was absolutely perfect. The perfect combination of sexy and cute. Whhhhaaa? That is just a line from Crazy, Stupid, Love, one of my favorite movies that I just finished watching. I’ve only seen it about 6 times!

The dough recipe that I used is from Bake at 360. The site is full of information. They have tons of video tutorials as well. I tried a couple of the methods for rolling out the dough and I ended up doing a mixture of them all. I taped a long sheet of wax paper to my countertop and I used 1/4 inch wooden rods that I also taped down to use as a guide because I can’t roll out dough very evenly without a guide. I used wax paper on top of the dough for awhile, but ended up just using flour on top of the dough instead. I also laid parchment paper down on my cookie sheets as the videos on the website recommend, which is something I have never done before. I just left the parchment paper on the cookie sheet and used the same one over and over again.

I had doubled the recipe and it made 7 dozen cookies. The cutouts I used were on the smaller side. Bake at 350 suggests freezing your cutout cookies on the cookie sheet for 5 minutes before baking and I did not do this. As for baking time the recipe suggests 10-12 minutes and I used the entire 12 minutes which was surprising because my oven usually takes less time than stated on most recipes. I would test it out a bit to see what works best for you.

That took a little longer than expected. 7 dozen ready to be frosted tomorrow ;)

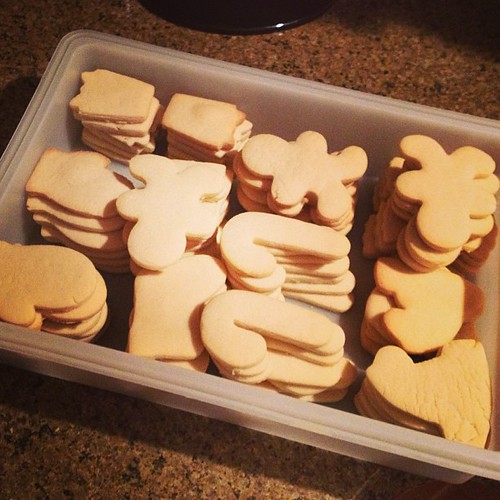
I ended up cutting out and baking all the cookies and decorating them the next day. I knew it would take me awhile to make the frosting and mix the colors and such since it was my first time making frosting from scratch. I also LOVED this frosting recipe, which I also found at Bake at 350. I doubled this recipe as well and had more than enough and made several different colors. Make sure if you use this frosting recipe you do keep your containers covered with saran wrap as the frosting will dry up pretty quickly.

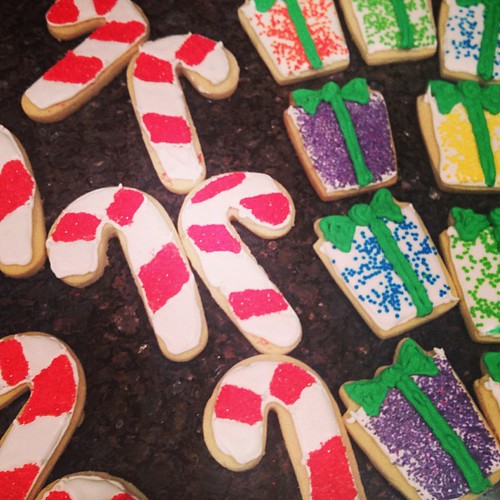
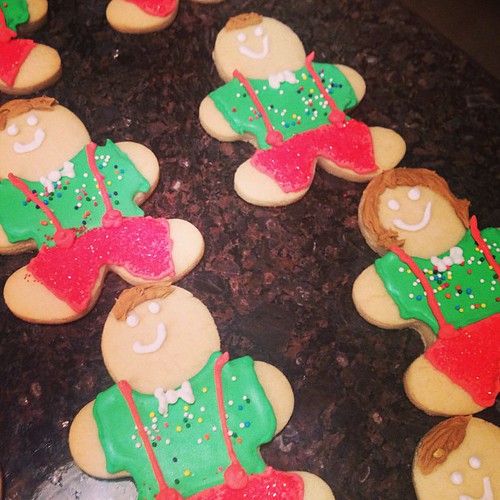
FLOODING!!! I was most excited about trying the outlining and flooding methods used to make these fabulous cookies! When you do these methods you have to thin out your frosting to put it in a squeeze bottle to flood the cookies. This calls for a bit of planning until you are comfortable with predicting how much of each color to set aside for outlining and how much for flooding. I ended up doing all my outlining first and then flooding last. I had my entire island countertop covered in cookies and frosting. It took me several hours to decorate all of the cookies, but I was so proud of myself at how well they turned out. As you can see I did used some sparkly sprinkles as well. So fun! Be sure to check out the Bake at 350 website for all of their awesome tutorials and cookie decorating ideas. Let me know if you have any questions on how I made these cookies. Also let me know of any websites that you use for cookie decorating.

These photos don’t quite show the details of the outlining and flooding like I wish they would. Again, I need to start using my Canon camera. I definitely don’t have the most steady hands and I loved how your lines didn’t have to be perfect to create a nicely decorated cookie. Not to shabby for my first time, right?

Not too bad for my first time making cookies this way!

More cookies...

And some more...

Can't forget the gingerbread men and one gingerbread lady!

I seriously can not wait for the next holiday to make more cookies. Probably Valentine’s Day!

recipes & crafts

Chicken Gnocchi Soup

Alright you Olive Garden lovers…you have to try this recipe for Chicken Gnocchi Soup. It tastes just like the soup from Olive Garden. When I made it, as you see below, it didn’t look exactly like the soup from Olive Garden – it ended up being more yellow for some reason. It tasted amazing though and was very close to the restaurants famous soup.

All of the ingredients.
Chicken gnocchi soup recipe

Chop up the veggies and add to the pot. I grated my carrots and I chopped up the celery, garlic and onion in a food chopper. The kids and I don’t like large chunks of veggies so to ensure they would all eat it I made them really small.
Chicken gnocchi soup recipe

Chop up the chicken. Using an already cooked rotisserie chicken makes it so much easier!
Chicken gnocchi soup recipe

After adding the water, chicken bouillon cubes and chicken, then add the best part – the gnocchi!
Chicken gnocchi soup recipe

Add the spinach and rest of the ingredients. Boil until the soup thickens. It’s smells soooo good!
Chicken gnocchi soup recipe

The gnocchi tastes delicious!
Chicken gnocchi soup recipe

Serve with an italian salad and just pretend you are at Olive Garden!
Chicken gnocchi soup recipe

Chicken Gnocchi Soup

Ingredients:
2 large carrots-peeled and grated
4 stalks celery-chopped
6 cloves garlic-chopped
1 medium onion-chopped
3 Tablespoons olive oil
1 Rotisserie Chicken + save any broth in the container
8 cups water
8 chicken bouillon cubes
16 ounce package of Potato Gnocchi
1 1/2 cups spinach, chopped
4 cups half and half
1 teaspoon thyme
1/8 teaspoon nutmeg
1 Tablespoon sugar
2 tablespoons butter
1/4 cup cold water
5 tablespoons cornstarch
salt & pepper

Directions:
1. Peel and chop up the onion and garlic. Peel and grate the carrots. Chop up the celery.
2. Pour 3 Tablespoons of Olive Oil in large pot and heat on medium.
3. Add the onion, garlic, carrots and celery. Cook for about 6 minutes on medium.
4. Add 8 cups of hot water into the pot and 8 bouillon cubes and stir together. Bring to a boil.
5. Take the skin off the rotisserie chicken, remove all the chicken from the bones and chop up the chicken and add to the pot.
6. Add any chicken broth that it is the bottom of the container and add to the pot.
7. Add the gnocchi to the pot. Continue to boil for 4 minutes or until the gnocchi float to the top of the soup.
8. Chop up the spinach and add it to the soup.
9. Add the 4 cups of half and half, 2 tablespoons of butter, 2 tablespoons sugar, 1 teaspoon thyme, and 1/8 teaspoon nutmeg.
10. In a separate bowl combine 1/4 cups cold water and 5 tablespoons of cornstarch. Once mixed pour it into the soup.
11. Season with salt and pepper.
12. Bring the soup to a boil until soup thickens.
13. Serve with breadsticks or salad or both!

PRINTABLE RECIPE JUST FOR YOU

recipes & crafts

Fruit Pizza

Sugar cookie, cool whip, cream cheese and fruit make up this yummy dessert. This is probably my kids all time favorite treat and the pan always comes home empty when bringing to gatherings. You can add any type of fruit that you wish so every time it tastes a little different! Try bananas, strawberries, kiwi, blueberries, grapes, and raspberries. Plus, since there is fruit, this counts as a healthy dessert, right?

Fruit pizza...it's healthy since there is fruit, right?

Fruit Pizza

Ingredients:
1 package refrigerated sugar cookie dough
1 pk (8oz) cream cheese
1/3 cup sugar
1/2 teaspoon vanilla
1 container (8oz.) cool whip
fruit of your choice

Directions:
1. Spread dough evenly across a pizza pan or baking pan.
2. Cook dough according to package directions. Let completely cool.
3. Mix together the cream cheese, sugar, vanilla, and cool whip.
4. Spread mixture across entire cookie.
5. Cut up fruit and add to top.
6. If using bananas, dip them in lemon juice or orange juice to prevent them from turning brown.

Chill until serving. Cut into slices or squares.

PRINTABLE RECIPE JUST FOR YOU!